In this blog post, I explain how to access your local server (that can be your Koha server) from outside your network using a free service called Cloudflare Tunnel.
This service is
- It is 100% free.
- Highly secure
You don’t need to punch any holes in your router.
So there is no need for Port-Forwarding . This works even if you don’t have any static public IP!
Steps to be followed
- Buying a free domain name
- Creating a Cloudflare account
- Configuring nameservers to point your domain to Cloudflare
- Installing the Cloudflare service and setting up tunnels
- Add an application to the tunnel (Ingress Rules).
For this tutorial, I used a Debian 11 (Bullseye) server on my machine (I use Next Unit of Computing (NUC)), a bare bones mini PC from Intel (you can even use a Raspberry Pi), and Godaddy for acquiring a domain name (you can use Freenom to get a free domain name), and the Cloudflare Zero Trust Service for remote access.
Let’s get started.
Registering a Domain Name
First we will grab a domain name go the link below and create a account for you
From Godaddy
From Freenom
Search for domain which suits you and register it .
Create a Cloudflare account
Now open Cloudflare Dashboard in your browser
Register a new account if this is your first time and move to the dashboard.
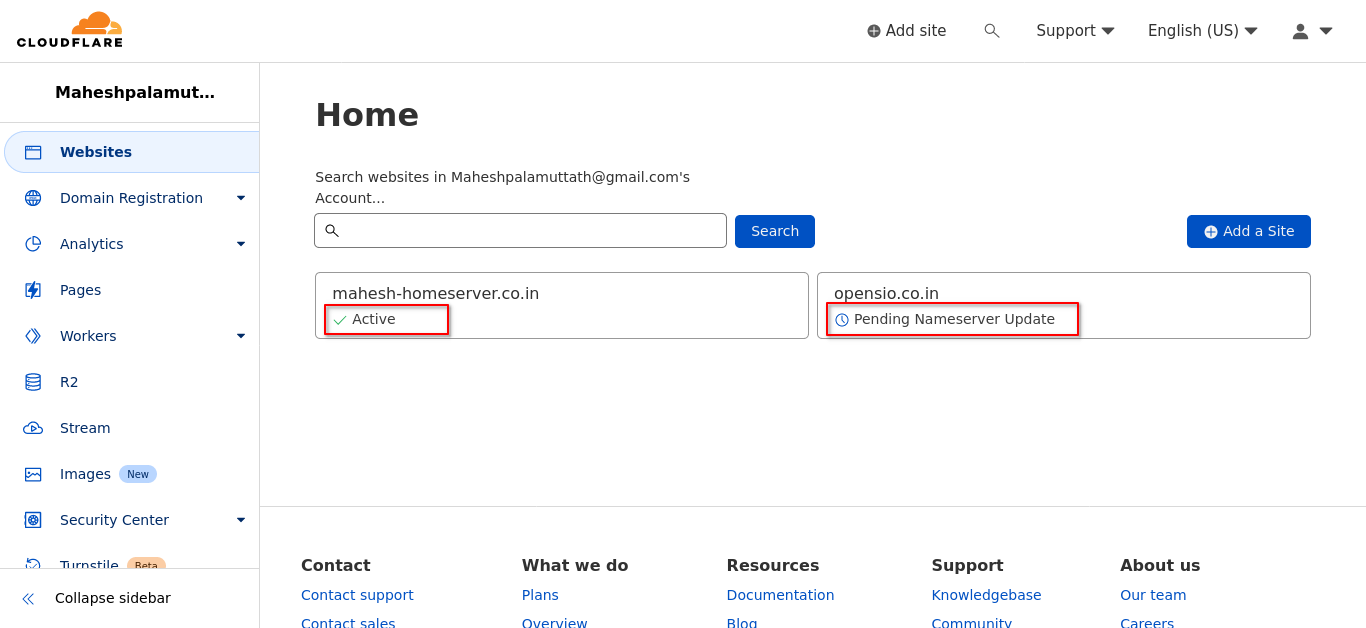
Now we will register a new site in Cloudflare with the domain name we just registered .

Enter the domain name in the next screen and click on “Add site“
Scroll down and select the free tier !

Cloudflare will search if there an DNS records already added for this site – But since this is the first time that we are registering it won’t find anything .
Changing the Nameservers in Godaddy to Cloudflare

In the left menu select DNS -> Records and scroll down to the bottom and here you will see the nameservers provided , Copy it and open Godaddy dashboard
Go to Godaddy dashboard
My Products -->> Account Settings -->> Select your Domain


Usually Name server updates take around 1-12 Hrs – Wait for sometime and check back in Cloudflare portal. Once it is updated you will see a Tick mark in the Site Name you just added which means the NameServer update was successful , if it is still pending you will see the mark as “Pending Nameserver Update”
Installing Cloudlfared on our local server (PC)
Now our domain name is pointing to Cloudflare ! We will go ahead and Launch the Zero trust dashboard . Site Name -> Access -> Launch Zero Trust

Login into to our local server via SSH Or through Desktop.
Installing any Required Software
1. Update and Upgrade Packages on Our Server
sudo apt update && sudo apt upgrade -y
2. Install two other require packages
sudo apt install -y curl lsb-release
Adding the Cloudflare Repository to our local server
3. With all the required packages in place, we can finally grab the GPG key for the Cloudflared repository and store it on our local server.
To save this key to your device, use the following command.
curl -L https://pkg.cloudflare.com/cloudflare-main.gpg | sudo tee /usr/share/keyrings/cloudflare-archive-keyring.gpg >/dev/null
A GPG key is crucial to verify the packages we are installing are valid and belong to the repository.
4. With the GPG key saved into our keyrings folder, our next step is to add the Cloudflared repository to our local server. You can add
echo "deb [signed-by=/usr/share/keyrings/cloudflare-archive-keyring.gpg] https://pkg.cloudflare.com/cloudflared $(lsb_release -cs) main" | sudo tee /etc/apt/sources.list.d/cloudflared.list
5. As we have made changes to the available repositories, we will need to perform another update of the package list cache,
You can update this cache by using the following command within the terminal.
sudo apt update
Installing Cloudfared on our local server
6. With the repository added, we can now proceed to install the Cloudflared package on our local server.
To install this package, you will want to run the following command:
sudo apt install -y cloudflared
Setting up a Cloudflare tunnel on our local server
Now that we have prepared our local server, we can set up the Cloudflare tunnel. This tunnel is where your traffic will be run over.
Authenticating with the Cloudflare Service
1. Our first step is to create an association between our local server and the Cloudflare service. We can begin authenticating with the Cloudflare service by using the command below.
cloudflared tunnel login
Ensure you keep Cloudflared open on your device while this process is completed.
2. After running the above command, you will see the following message appear within the terminal.
You will want to go to the URL displayed in the message and use it to log in to your Cloudflare account.

3. Once our local server is successfully authenticated with the Cloudflare service, you will see the following message:

Creating the Cloudflare Tunnel on our local server
4. Now that we are authorized, we can create a Cloudflare tunnel by using the following command.
Ensure you replace “mytunnel” with the name you want to assign this tunnel.
cloudflared tunnel create mytunnel
5. After running the above command, you will see a message similar to the one below.
You will want to write down the ID as we will need this for later.

Confirm that the tunnel has been successfully created by running:
cloudflared tunnel list
Routing the Tunnel to a Domain Name
6. With the tunnel created, we can now route the tunnel to a domain name that we have with Cloudflare. This will allow us to access our local server through that domain name.
Ensure you replace “mytunnel” with the name of your tunnel and replace “opensio.co.in” with the domain name you want to use.
cloudflared tunnel route dns mytunnel your-domain-name.com
7. If the above command worked correctly, you would see a similar message to the one below. This message confirms that Cloudflare created a CNAME that routes to your tunnel.

See your cloudflare website's DNS

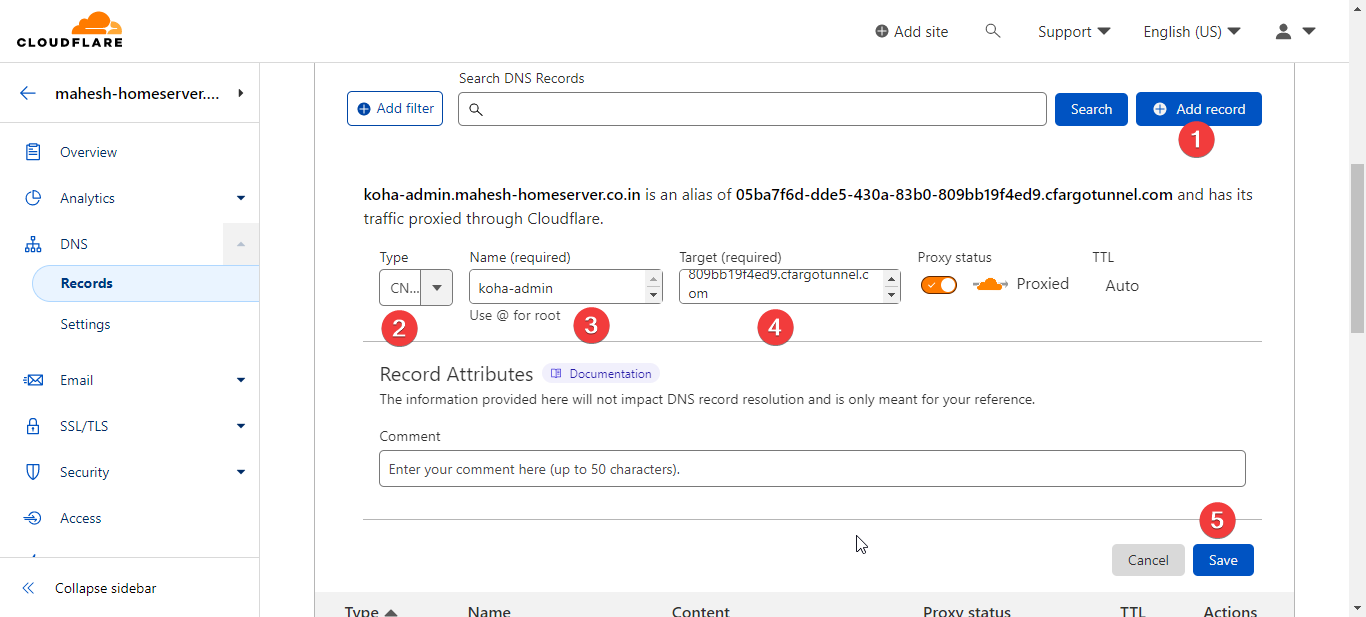
No, we need to create two more CNAME records in the DNS, one for the Koha Staff interface and another for the OPAC interface by clicking on the "Add Record" button on the right side of the DNS records. Before that, copy the target from the DNS record that was initially created.
These are the subdomains I intend to use.
koha-admin
koha-opac

Step:1


Adding First CNAME (subdomain) for Koha Staff Client
Adding Second CNAME (subdomain) for Koha OPAC Client

Fianl result of CNAME records

Now now both the CNAME’s are pointing to the same tunnel , we will route the traffic to both the interfaces accordingly using the ingress rules . Open up the config.yaml file and add the below-mentioned code snippet. Change the ports according to your interface. Note: Here I am going to add Koha staff port 8080 and OPAC port 80, since I have used these port in koha. Save the configuration and start the tunnel again.
Forwarding our local server Ports through the Cloudflare Tunnel
Note down the tunnel ID and run the command below.
cloudflared tunnel list
Create a yml file replacing XXXX with your tunnel ID
sudo nano ~/.cloudflared/config.yml
tunnel: XXXXXXXXXXXXXXXXXXXXXXXXXXXXXXXXXXXXXXXXXXXXX
credentials-file: /home/mahesh/.cloudflared/XXXXXXXXX.json
ingress:
# Rules map traffic for Koha Staff Interface:
- hostname: koha-admin.mahesh-homeserver.co.in
service: http://localhost:8080
# Rules map traffic for Koha OPAC Interface:
- hostname: koha-opac.mahesh-homeserver.co.in
service: http://localhost:80
- service: http_status:404
save the file
With the config file created, we can install it as a service using the following command.
This command will copy our config file to the correct location and prepare a service file for systemd.
sudo cloudflared --config ~/.cloudflared/config.yml service install
We can enable the Cloudflare tunnel service so that it will start when our local server does by using the following command.
sudo systemctl enable cloudflared
Finally, you can ensure the tunnel is online now by using the command below within the terminal.
sudo systemctl start cloudflared
Restart the Tunnel
cloudflared tunnel run mytunnel
We will test this in our browsers by visiting the new subdomain.
koha-admin.mahesh-homeserver.co.in
koha-opac.mahesh-homeserver.co.in
References:


